Search

Wednesday, August 31, 2011

Ubuntu 10.10


Have you tried using Ubutu OS? Got any troubles dealing with it?

This 158 Page Guide, Provided by Ubuntu will cover the basics of Ubuntu 10.10 (such as installation and working with the desktop) as well as guide you through some of the most popular applications.
This guide is simple to follow, with step-by-step instructions and plenty of screen shots, allowing you to discover the potential of your new Ubuntu system even if you are a novice computer user or are migrating from another operating system for the first time. Getting Started with Ubuntu is not intended to be a comprehensive Ubuntu instruction manual. It is more like a quick-start guide that will get you doing the things you need to do with your computer quickly and easily, without getting bogged down with technical details.
Download it here;

A Complete Beginner’s Manual for Ubuntu 10.10 (Maverick Meerkat)

     Download Ubuntu here.

Bring Your old Computer Case Back to Life!_2


 Now that the vinyl dyeing is out of the way it's time to start using the contact paper to cover the case.  I started with the top of the case by laying the contact paper over it and getting a rough measurement of how much I would need to cover it, you will want to leave a little excess on the side edges as well as the front and back.  Cut your piece of contact paper with the X-Acto knife, remove the backing and press it into place.  The good thing about contact paper is that if you don't get everything lined up with the first try it is very forgiving and will easily come off and allow you to reposition it for as many tries as it takes to get it right. Smooth out any air bubbles in the contact paper using your hand.  Pinch the corners together as shown in the picture below and run the X-Acto up the crease (do not cut too far up though) only go to the corner of the case.  Cut the excess corner pieces off and smooth everything down.
    Next move to the side edges of the case where the contact paper hangs down and cut off the excess with the X-Acto knife.  Leave a little excees hanging over, just cut enough of it off to allow for the holes that hold the door on to show.
    The finished top should look like this, take a break and have another beer.
Now it's time to do the side panels.  First I laid the case door down onto the contact paper that was rolled out.  Then I cut it with the X-Acto knife leaving about a half inch excess on all sides.  The back of the contact paper has lines that make cutting it straight very easy.
    Flip the side panel over and remove the backing from the contact paper.  Adhere the contact paper to the side panel and rub any air bubbles out with your hand.  Place the panel contact paper side down and cut all the corners as shown in the picture below.
    Fold the edges of the contact paper onto the back of the case.  Repeat the process for the other side panel.
    Now it's time to reassemble the whole thing, screw the freshly painted front panel on first and reinstall the drives and drive blanks.  Then put the side panels back on.
    Looks pretty sharp, doesn't it.  The vinyl dye cost me $6.66 and the contact paper was $2.99 for a nine foot roll which brings this mod in under the ten dollar mark (the six pack of beer cost extra and was not factored into the final cost).  Below is another picture of the finished product.
    Surprising that an old throw away case could have new life breathed into it with ten bucks and two hours worth of work.  Have another beer (or two) and congratulate yourself on completing a kick ass mod.
Happy Modding

Bring Your old Computer Case Back to Life!_1


  This simple guide will show you how to turn a crap-tacular looking case into something that you can once again be proud of.  Not everyone has the money to buy a better looking or brand new case, but almost anyone can scrounge up the ten dollars needed to do this mod.  Combine this with the five dollar window mod we did in an earlier how-to guide for an even classier modded look.
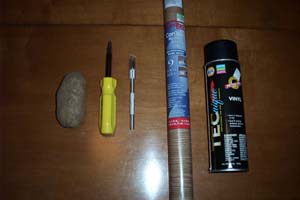
Tools Needed
X-Acto Knife
Phillips Head Screwdriver
Potato 
Materials Needed
Can of Black Vinyl Dye
Wood Grain Contact Paper
    
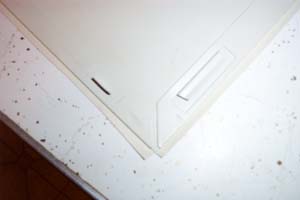
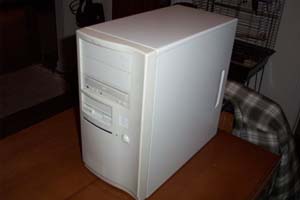
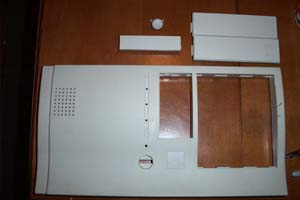
    The victim: an old 787 Midtower ATX case.  Cigarette smoke has discolored the front bezel, there are also spots where it got hit with a marker and it basically looks like something you would find sitting out by the road on trash pick up day. It was a decent case back in the day but time has not been kind to it, it's definitely not a pretty sight in its current condition... but that's all about to change.

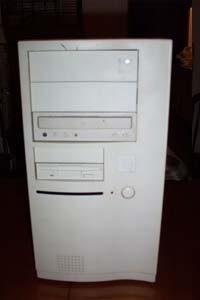
 A view of the front of the case, you can see where the marker hit it at the top.
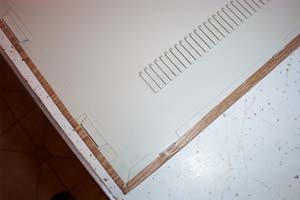
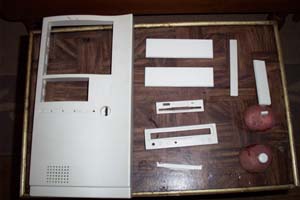
    The first thing you need to do is remove the drives and any blanks, then unscrew the front bezel and set it aside. You will need to remove the faceplates from your cd-rom drive and floppy drive.  For the cd-rom the tray must be in the ejected position for the tray face to slide up and off, next push in the tabs and slide the drives faceplate off.  Take the front off the floppy by pressing in the tabs and slide it off.  Take the door off the floppy drive, there is a spring that you need to take notice of, remember how it goes back on or the door won't flip down correctly when you reassemble it.  Remove the floppy drive's eject button and either mask off or carefully pry off the clear plastic piece for the LED, I took the clear plastic piece out and the little tabs broke off but it's nothing a little superglue won't fix later.
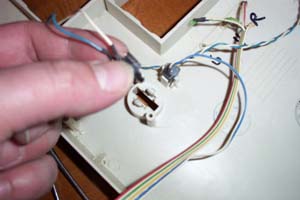
    Grab the front case bezel and flip it over, remove the reset button and power button and any LED's.  I marked the inside of the case with a marker so that I would remember which LED's went where.  Use a bowl to put all your small parts and screws into so they don't get lost.
    Wash all the plastic pieces with a mild soap and water solution and allow them to dry completely, wash the drive pieces as well and have a beer while you wait for them to dry.
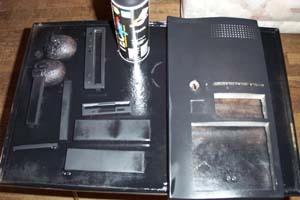
    Arrange all the plastic pieces so that you can vinyl dye them, I use an old TV tray because it's convenient and sits at a good height for painting.  Break out the potato and cut it in half (bet you were wondering why you needed a potato, right?).  Jab the floppy eject button and power button into the potato to keep them sitting level and make painting them easier.
    Shake the can of vinyl dye well and start spraying the parts.  Vinyl dye is very quick drying, three coats took less than a half hour to dry but I also sped things up with a hair dryer between coats.  Make sure you use the vinyl dye in a well ventilated area as it stinks to high hell, especially when you hit it with a hair dryer.  The picture below shows what it looks like after one coat.
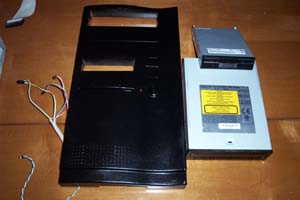
    Give everything about three coats of vinyl dye, have another beer and wait at least a half hour.  Then you can start putting the drives back together.  Put the cases front bezel back together as well by reinstalling the power button, the reset button and all LED's, then set it aside.

Web Cam


ArcSoft WebCam Companion


You got a web cam and are you lost how to manage it? Check this out!
ArcSoft Webcam Companion


ArcSoft WebCam Companion offers a broad range of applications designed and optimized for webcam use, whether utilized to record video or to take a special photo, ArcSoft WebCam Companion 3 lets you get the most out of any webcam. It brings together ArcSoft's latest Webcam applications into one great user experience. Starting from the Launch Pad, you can access any of ArcSoft's great new Webcam applications including: Capture, Edit, Masque, Fun Frame.
  • Capture
  • Edit
  • Fun Frames and more..!


Tuesday, August 30, 2011

PC Web Cam as a security Camera

6 Reasons to set up a motion activated web-cam
  1. Maybe you live in a questionable (at best) part of East Vancouver and you’ve already been broken into (while you were doing the dishes). It would be helpful next time to have pictures of the intruder.
  2. Maybe you’re trying to prove to your landlord that some of the more questionable members of the general East Vancouver public are using the pathway between your building and the one next door as a shortcut between streets. Often with very large bags of cans (it’s a Vancouver thing). Loudly. At all hours of the day and night.
  3. Perhaps you want to catch someone using your PC after you’ve asked them repeatedly not to use it (because they seem to go out of their way to install spyware, toolbars you don’t want, and leave behind Britney Spears mp3s on your desktop)
  4. You’re bored?
  5. You want to get pictures of the pretty birdies eating from your new bird feeder.
  6. Yeah I know what you were expecting here, that’s lewd. Get your mind out of the gutter, this is a family site.
For this tutorial you’ll need:
  1. a PC running Windows 98, ME, 2000, XP (the software is untested on Windows 95 and NT, but should work)
  2. a webcam (or two, see advanced)
  3. Dorgem – an open source (free) webcam utility. Update: Though Dorgem has been discontinued, the download links still work, as does the software. The author will not be updating it anymore, and won’t be answering email support questions.
To upload images ‘off-site’ (in case someone steals your computer) you’ll need an FTP account. See the Advanced section when you’re done the initial setup.
  1. Install (if it isn’t already) your webcam. If you’re pulling one out of the closet and have long since lost the install CD, here are links to download the drivers for some of the most common webcam vendors:
  2. Download and install Dorgem. The installation is very straight forward, you’ll mostly click Next a bunch of times.
  3. Launch Dorgem and select your Webcam from the Camera selection drop-down list.
  4. Click the Preview button to display the view your webcam has. Physically adjust the camera to face the area you want to monitor.
  5. security web cam dorgem
    security web cam dorgem
  6. Click the Source button and make any adjustments to the BrightnessContrast and/or other settings. Click OK when you’re happy with the results.
  7. Click the Options button
  8. Place a check in the box labeled Use motion detection. Certain Webcams (most often Labtec) can require Dorgem to “reconnect” after a certain period of no motion being detected. For now leave this box unchecked. If you notice that your Webcam isn’t capturing any images even though it should have, revisit this section and place a check in the box. It should be noted that if you do need to use this setting, your cam will likely take a picture every time Dorgem “reconnects” to it, so try using 5 minute (or higher) intervals. Otherwise you’ll end out with a LOT of pictures, most of which won’t have captured actual “motion”.
  9. Click OK after you have enabled motion detection to return to the main Dorgem window. Now you’ll need to create a ‘profile’ – which Dorgem refers to as Storage events. Click the Store settings button to create an event.
  10. Choose File and click OK (adding an FTP event is covered in the Advancedsection, set a local file first to make sure everything works)
  11. security web cam dorgem
  12. Enter a Name: for this event, make sure Enable is checked, and then set an interval. Since you’ll be using motion detection, you probably want to capture images fairly “closely together” – so try 1 or 2 seconds. If you know for certain that this camera will detect a lot of motion (your camera faces an area with a lot of movement) you may want to set this somewhat higher. This setting can always be changed later, so experiment a bit. Click the  button next to Filename:
  13. Here you’ll be setting the folder to save images to, and the actual filename for each image. Dorgem allows special characters in file names so that each name is unique (otherwise each time your camera detected motion it would take a picture and over-write the previous one). Somewhere in the file name, enter the characters %g – which will give your file name a time-stamp. If you use %G in the file name, it will also add the current year.
    Because my camera is taking pictures of movement on my patio, I named the filepatio-camera%G%g. This results with images being saved as patio-camera20060926165001.jpg. Broken down that’s patio-camera – the current year – the current month, day, hour, minute and second. Click Save after you’ve selected a folder and file name.
  14. Click OK
  15. Click Close to return to the main Dorgem widow
  16. Wave your hand in front of the camera. Or throw something within its view. Jump around in front of it like an idiot. If everything was set correctly, you should now have some images in the folder you specified. Go take a look..
  17. moron
  18. If it didn’t work, start again at step 3 and double-check everything. The built-in Help file included with Dorgem is actually pretty helpful – use it for troubleshooting. Feel free to leave a comment below and include as much info as possible and I’ll try to help as well.
Multiple Webcams
If you can get more than one Webcam to work in Windows (not always an easy task, esp. if they’re Labtec), Dorgem can support them all. You don’t need to install another copy of Dorgem, but you do need to start each instance differently. To do so, follow the steps below..
  1. Right-click on your current Dorgem desktop icon and select Create Shortcut
  2. You should see a new Dorgem (2) icon on your desktop – right-click on it this time, and choose Properties
  3. Make sure the Shortcut tab is selected, and change the Target: to:
    “C:\Program Files\Dorgem\Dorgem.exe” /c:cam2
    If you installed Dorgem to somewhere other than the default location, make the appropriate changes.
  4. Click Apply and then to return to your desktop. Double-click the Dorgem (2) icon. When it launches, notice that it’s titled Dorgem (cam2). Repeat the same steps you did for the first camera (though choose a different file name to save the image as).
Sending pictures to a remote location (FTP)
If you’re using this as a personal security system for your residence, you may want to store the files off-site, in case someone steals your computer (rendering your security totally useless). To do so, follow these steps.. (note: you’ll need an FTP account – check to see if your ISP provides one for you, eg. Personal Web Space/storage).
  1. Click the Store settings button and then click Add.
  2. This time select FTP and then click OK
  3. security web cam dorgem
  4. Enter in the required information. The file name can use special characters (see step 11 in the first How part of this tutorial). You may have to experiment with some of these settings. For example, I have to use Passive mode because of the way my home network is set up. You may not. Click OKwhen all of the required info has been entered.
  5. Wave your hand in front of the webcam (or throw something through its field of view). Check your FTP site and you should see a new file (or files) there. Note:when I have both save to my local hard drive and save to FTP enabled, only one works. You may need to disable the local copy if you want FTP to work. If you figure out a way for both to work, by all means let me know.
How to duct tape the light off your webcam (super-stealth)
  1. Does your webcam have an annoying light that gives away its location when you try to hide it?
  2. fine i will never be a pro photographer
  3. Find some duct tape that matches the colour of your camera. Or, masking tape and a marker.
  4. fine i will never be a pro photographer
  5. Place tape over the light.
  6. fine i will never be a pro photographer
  7. Your camera will now blend in like a ninja. Extra bonus: use the duct tape to hold your hidden camera in place.
Yes, birds will trigger the motion sensing webcam.
life in east vancouver
Seriously, this isn’t a shortcut for you to use.
life in east vancouver
How patio furniture gets stolen.
life in east vancouver
I don’t care if you’re practicing your tight-rope walking, stop using this area as a shortcut.
life in east vancouver
You too.
life in east vancouver
My webcam lets me know when not to open my blinds. AKA get an unrequested view of some carpenters crotch.
life in east vancouver